WP Super Cache Plugin
The following article is for reference only. Please note that HostGator cannot offer direct support for the information provided below.
One way to optimize your WordPress website is to install a WP Super Cache plugin, which can be done from your WordPress Dashboard under the Plugins section.
Recommended Settings
To configure the WP Super Cache plugin, log in to your WordPress Dashboard. Once logged in, please complete the four (4) steps as discussed below.
Step 1: Install Plugin and Set the General Settings
- From the left-side menu, locate and click Plugins.
- Select Add New.
- Search for the WP Super Cache plugin using the search box on the right-hand side.
- Click Install Now once the WP Super Cache plugin box appears.
- Click Activate.
- Once activated, you can now click Settings. Alternatively, you can also go back to the Plugins section and select Installed Plugins to see your installed plugins.
- Look for WP Super Cache, then click the Settings link.
- Go to the Advanced tab.
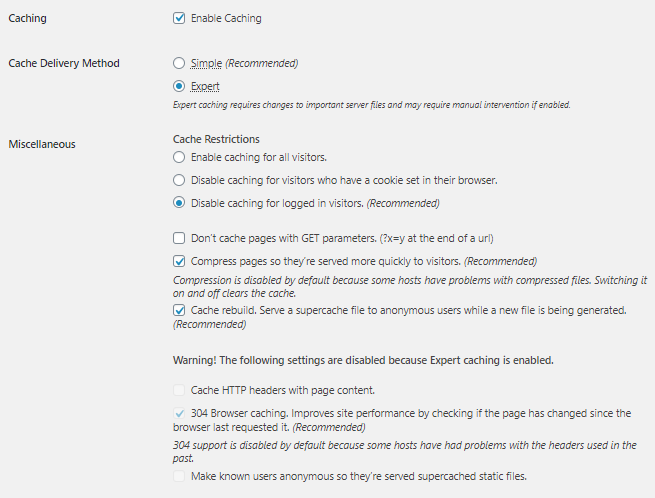
- Follow these recommended settings.

- Put a checkmark on Enable Caching.
Once enabled, it provides an easy way to improve load times.
- Select the radio button next to Expert.
- Put a checkmark on Disable caching for logged-in visitors. (Recommended).
This prevents logged-in users from being served cached pages and is the default for almost every caching plugin out there.
- Select the box next to Compress pages, so they’re served more quickly to visitors. (Recommended).
Super Cache files are compressed and stored that way, so the heavy compression is done only once. These files are generally much smaller and are sent to a visitor’s browser much more quickly than uncompressed HTML. As a result, the server spends less time talking over the network, saving CPU time and bandwidth, and serving the next request much more quickly.
- Make sure that the Cache rebuild option is checked.
- Check the box next to 304 Browser caching.
Please note that 304 not modified browser caching will not be selectable as long as you have mod_rewrite in use. You will need to use one or the other as recent updates to the WP Super Cache Plugin have made the use of both inaccessible at this time.
- Put a checkmark on Enable Caching.
- Scroll a little bit down and hit the Update Status button to save your settings.
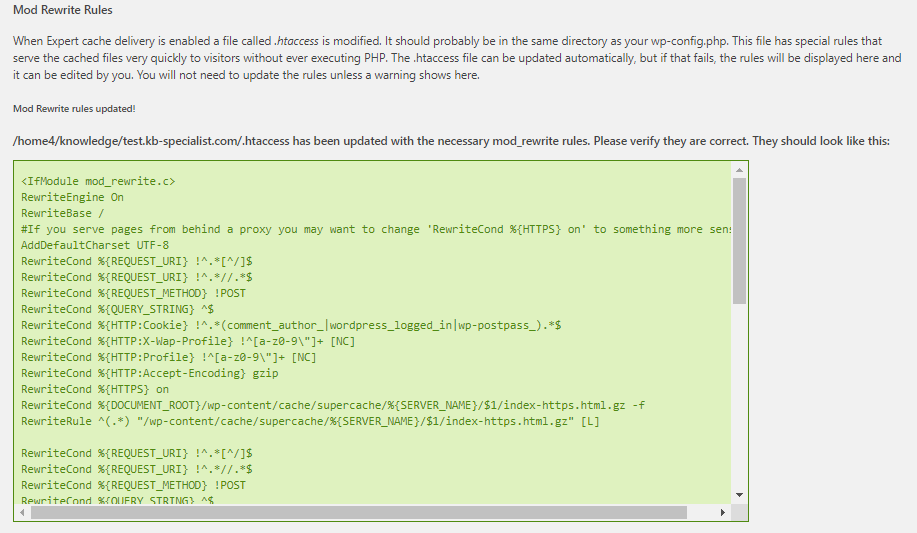
Step 2: Set the Mod_Rewrite Rules
Scroll down and select click the Update Mod_Rewrite Rules button.


Step 3. Set the Garbage Collection
The default setting will allow cache files to age 1 hour (3600 seconds) prior to being removed, which is ideal. This setting can be increased for sites that do not have many posts (1,000 or less ) if you do not update your content often. If you have a tremendous amount of posts (25,000+), a lower setting around 1800 may be more viable to prevent stat/CPU issues due to the number of files being created.
- Scroll down to the Expiry Time & Garbage Collection section.
- In the Cache Timeout field, enter 3600.

- Scroll down and hit Change Expiration to save the changes.
Step 4. Set Rejected User Agents
It is recommended that you do not remove the default user agents from the list, to prevent bots from caching content and pages not normally seen by your visitors. For example, if you have a calendar, a real visitor may only browse months close to now, but a bot will index every month forever as if it is a different page. In caching these pages, real visitors are unlikely to visit waste resources.
